Lime Electricity Lightning

Sunday, July 27, 2014

WRITE PROTECTED मेसेज की समस्या का समाधान

कंप्यूटर की ऐसी बहुत सी समस्या है जो अचानक आने पर हम अपना सर पकड कर बेठ जाते है आज मैं आपको एक ऐसी ही समस्या के समाधान के बारे में बता रहा हु जिसके आने के बाद हर किसी का दिमाग खराब हो जाता होगा 
ये समस्या है write protected मेसेज की जो अक्सर मेमोरी कार्ड या पेन ड्राइव लगाने पर आ जाता है


Cannot copy files and folders, drive is write protected

Cannot format the drive, drive is write protected

The disk is write protected

Remove write protection or use another disk

Media is write protected

इस मेसेज के आने के बाद न तो आपके कार्ड में कोई फाइल कॉपी होती है और ना ही वो कार्ड या पेन ड्राइव फोर्मेट होती है आज मैं आपकी इसी समस्या का हल लेकर आया हु जो मैं तरीका बता रहा हु उसे करने के बाद आपकी समस्या का हल हो जायेगा और ये मेसेज फिर कभी आपके सामने नहीं आएगा 
अगर आप इस समस्या से छुटकारा पाना चाहते है तो सबसे पहले यहाँ क्लीक कर के एक फाइल हो डाउनलोड कर ले ये एक रजिस्ट्री की फाइल है 
इसे डाउनलोड करने के बाद इसे  डबल क्लीक कर के ओपन करे
इसके बाद स्टार्ट बटन पर क्लीक कर के Run पर क्लीक करे और वहा Regedit लिख कर ok करे
फिर यहाँ जाये


HKEY_LOCAL_MACHINE > SYSTEM > CurrentControlSet > Control > StorageDevicePolicies


यहाँ जाने के बाद सामने के बॉक्स में WriteProtect पर डबल क्लीक कर के इसकी value को 0 कर दे जैसे चित्र में दिखाया गया है फिर ओके कर के अपने कंप्यूटर को रिस्टार्ट करे अब आप कुछ भी अपने मेमोरी कार्ड या पेन ड्राइव में कॉपी कर सकते है कभी कोई का मेसेज नहीं आएगा.

Saturday, July 26, 2014

किसी भी वेबसाइट को लोक करने का आसान तरीका

आज में आपको एक बहुत ही आसान तरीका बताता हू किसी भी वेबसाइट को लोक करने का वो भी बिना किसी सोफ्टवेयर की साहयता के

1) सबसे पहले आप नीचे दिए गए address को स्टार्ट मीनू मे जाकर Run में कॉपी करके पेस्ट कर दे.
C:\windows\system32\drivers\etc
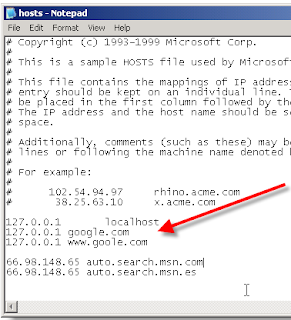
फिर आप देखेंगे की उसमें "hosts" नाम की एक फाइल होगी बस उसे आप नोटपैड के साथ खोले.
2) "127.0.0.1 Local host" आप इस लाइन को उसमें खोजे, बस इस लाइन के नीचे से ही आप जो साईट block करना
चाहते हैं add करते जाए. और हां ये ज़रूर ख्याल रखियेगा की एक लाइन में एक ही साईट होनी चाहिए और साथ ही
ये भी ख्याल रखियेगा की जब भी आप कोई साईट block करे तो IP add का आखरी वाला नम्बर ज़रूर बड़ा के लिखे.
उदहारण के लिए :-
127.0.0.1 localhost
127.0.0.2 www.yahoo.com
127.0.0.3 www.love123.com
127.0.0.4 www.gmail.com


undefined

अब उस फाइल को save करके बंद कर दे. और कंप्यूटर को रिस्टार्ट करे बस आपका काम हो गया अब कोई भी इन साईट को नहीं खोल पायेगा जो अपने एड करी है

नेट की स्पीड रहेगी आपके हाथ में


अक्सर जब हम नेट से कोई सौफ्टवेयर डाउनलोड करते है तो किसी और साईट को खोलने पर नेट की स्पीड कम हो जाती है वेब साईट खुलने में बहुत टाइम लग जाता है तो आज में आपकी इसी समस्या का हल लेकर आया हू नेट बैलेंसर नाम एक ऐसा ही सौफ्टवेयर है इसके जरिए आप चलने वाली सभी “प्रोसेसो” को अलग अलग वरीयता देकर स्पीड सेट कर सकते हो यानि अब आपके नेट की स्पीड रहेगी आपके हाथ में
सौफ्टवेयर डाउनलोड करने के लिए यहाँ क्लीक करे

सभी इन्टरनेट ब्राउज़र के लिए कुछ उपयोगी टिप्स.

  • किसी भी इन्टरनेट ब्राउज़र के Address bar में सीधे जाने के लिए आप Alt+D बटन का उपयोग करे


  • आपको किसी भी इंटरनेट ब्राउज़र के Address Bar में किसी .com वेबसाइट या ब्लॉग  का पूरा पता टाइप करने की जरूरत नहीं है....  जैसे  www.google.com

                      www.yahoo.com
                      www.rediff.com
                      www.navjyotkumar1.blogspot.com

इसकी जगह आपको सिर्फ बीच वाले शब्द ही टाइप करने चाहिए और Ctrl+Enter का बटन दबा कर आप उस साईट पर जा सकते है... कहने का मतलब यह है की आपको www.   और .com टाइप करने की जरूरत नहीं है। 
जैसे मेरे ब्लॉग का पता आप Adress bar में सिर्फ suman-dass.blogspot.in टाइप करे. और Ctrl+Enter बटन दबाए, देखे कैसे मेरा ब्लॉग खुल जाता है। 

  • जब आप ईमेल या फेसबुक आदि में लोगिन करते है तो यूज़रनेम और पासवर्ड बक्से में जाने के लिए लिए आप tab बटन का उपयोग करे... इससे आप एक बॉक्स से दुसरे बॉक्स में बिना माउस का इस्तेमाल किये बगैर आप जा सकते है। 

और पिछले बॉक्स में वापिस जाने के लिए आप Shift+Tab बटन का उपयोग कर सकते है। 


  • किसी भी वेबसाइट या ब्लॉग की पोस्ट के  अक्षरों को अगर आप बड़ा करके देखना चाहते है तो आप Ctrl बटन दबा कर रखे और + का बटन दबाए (ध्यान रहे + बटन वही दबाए जो आपके numeric keys में बना है)  , जितना आप इसको दबाएंगे  उतने ही बड़े अक्षर होते जाएंगे.

अगर आप इनको फिर से छोटा करके या इनके असली रूप में देखना चाहते है तो Ctrl बटन दबा कर रखे और - का बटन दबाए। 


  • अगर आप किसी वेबपेज के पीछले पेज पर जाना चाहते है तो आप Backspace बटन का उपयोग करे.. 

नहीं तो आप Alt+Left Arrow key को एक साथ भी दबा कर भी  इसका उपयोग कर सकते है।  
और अगले पेज पर जाने के लिए आप Alt+Right Arrow key का प्रयोग कर सकते है।  

  • अगर आप किसी वेबपेज या वेबसाइट को दुबारा Reload या Refresh करना चाहते है तो आप F5 बटन का उपयोग करे.

  • अगर आप किसी भी इंटरनेट ब्राउज़र को फूल स्क्रीन में देखना चाहते है तो आप F11 बटन दबाए.
अगर आप फिर उस स्क्रीन को Normal देखना चाहते है तो  फिर से आप F11 बटन का ही उपयोग करे.

  • अगर आप चाहते है की किसी वेबसाइट या ब्लॉग पर दी गयी कोई  लिंक अलग पेज या Tab में खुले, तो उस लिंक को आप Ctrl बटन दबा रखे और फिर  क्लीक करे।  इससे वह लिंक दुसरे Tab या पेज में खुलेगी।  

अगर आप वेबसाइट या ब्लॉग से  किसी फोटो या चित्र को अपने कंप्यूटर में सेव करना चाहते है तो उस फोटो को माउस से क्लीक कर अपने डेस्कटॉप पर ड्रैग करके छोड़ दे... कहने का मतलब यह है की उस चित्र को माउस से पकड़कर डेस्कटॉप पर लेजाकर छोड़ दे. वह चित्र आपके डेस्कटॉप पर सेव हो जायेगा

बूटेबल पेन ड्राइव बनाने के बेहतरीन तरीका

आजकल हर किसी को कंप्यूटर मे विंडो डालना आता है बस बूटेबल सीडी लगाओ ओर विंडो डाल लो लेकिन जब बात किसी ऐसे सिस्टम मे विंडो डालने की आती है जिसमे डीवीडी रोम खराब होता है या उनमे डीवीडी ड्राइव होती ही नही तो ऐसी हालत मे हर कोई विंडो नही डाल पाएगा क्योकि ऐसे सिस्टम मे विंडो पैन ड्राइव से डाली जाती है ओर जहां तक मेरा खयाल है काफी लोगो को पैन ड्राइव से विंडो डालने की जानकारी नही होगी

आज मै आपके सामने पेन ड्राइव से विंडो डालने की ही जानकारी लेकर आया हु क्योकि आजकल बाजार मे बहुत से ऐसे नेटटॉप आ रहे है जिसमे डीवीडी ड्राइव नही होती उसमे बस आप पैन ड्राइव की साहयता से ही उसमे विंडो डाल सकते है।
इसी से जुडी एक पोस्टमैन पहले भी लिख चूका हु लेकिन बहुत से लोगो को उस टूल को इस्तेमाल करने में परेशानी आयी है आज की पोस्ट के जरिये आप बहुत ही आराम से किसी भी विंडो की बूटेबल पेन ड्राइव बना सकते हो और उसके द्वारा पीसी में विंडो डाल सकते हो

अब मै आपको बताता हु कि कैसे आप पैन ड्राइव की साहयता से विंडो डाल सकते है। पैन ड्राइव से विंडो डालने के लिए सबसे पहले आपको अपनी पैन डाइव को बूटेबल बनना होगा। पैन ड्राइव को बूटेबल बनाने के लिए सबसे पहले आप अपनी पेन ड्राइव को सीपीयू में लगा दे और उसके बाद विंडो XP की या किसी भी विंडो कि बूटेबल सीडी डीवीडी ड्राइव में डाल दे अब आपको इस बूटेबल विंडो की इमेज फ़ाइल बना कर अपने सिस्टम में सेव करनी है
विंडो की इमेज फ़ाइल कैसे बनाई जाती है इसके लिए आपको मेरी ये पोस्ट पढ़नी होगी 

 विंडो कि इमेज फ़ाइल बनाने के बाद आपको यहां क्लिक करके एक सॉफ्टवेयर डाउनलोड करना होंगा ये सॉफ्टवेयर आप किसी भी ऑपरेटिंग सिस्टम के लिए डाउनलोड कर सकते हो अगर आपने Linux डाला हुवा है या आप Apple Mac Pro पर काम करते हो उसके लिए भी ये सॉफ्टवेयर आपको इसी साइट पर मिल जाएगा सॉफ्टवेयर डाउनलोड करने के बाद इसे अपने सिस्टम में इंस्टाल करे
इस सॉफ्टवेयर को ओपन करे इसके बाद चित्र के अनुसार Tools पर क्लीक करने के बाद Create Bootable USB Drive पर क्लीक करे
Create Bootable USB Drive पर क्लीक करने के बाद आपके सामने एक विंडो खुल जायेगी जैसे आप ऊपर चित्र में देख रहे है ये विंडो खुलने के बाद आपको Source image file वाले बॉक्स में विंडो कि इमेज फ़ाइल सलेक्ट करनी है और Destination Usb Drive पर आपको अपनी वो पेन ड्राइव सलेक्ट करनी है जो आपने अपने पीसी के USB सॉकेट में लगा रखी है सलेक्ट करने के बाद चित्र के अनुसार स्टार्ट बटन पर क्लीक कर दे
क्लीक करने के बाद आपकी पेन ड्राइव में विंडो कि फ़ाइल कॉपी होना सुरु हो जायेगी

सारा काम फिनिस होने के बाद आपकी पेन ड्राइव विंडो डालने के लिए बिलकुल तेयार है आप पेन ड्राइव से किसी भी सिस्टम में विंडो डाल सकते है लेकिन ध्यान रहे जिस सिस्टम में आप पेन ड्राइव से विंडो डालने जा रहे है उसमे बूटेबल वाले ओपशंस में पेन ड्राइव का ओपशंस होना चाहिए वेसे आजकल हर सिस्टम में ऐसा ओपशंस होता है जो मैंने आपको ऊपर सॉफ्टवेयर दिया है उसकी सहयता से आप किसी भी विंडो की बूटेबल पेन ड्राइव आराम से बना सकते हो

How to Format a computer using a Windows XP disc

  1. First you must put your Windows XP CD in the drive.
  2. Then restart your computer.
  3. When it says press any key to boot from cd, Press any key on the keyboard. (Go to step 6)
  4. If it doesn’t ask you this then restart your computer again.
  5. Go into the BIOS settings of your PC, usually by pressing the F1, F2, F10, or maybe the delete key. If you are not sure watch the screen at startup and it will say “To enter setup press…….”. You have to be quick and press it. If you miss it restart again. Once you are in the bios you have to change the boot options. You have to make your cd rom the first boot option. Save and exit.
  6. A blue screen will appear and you are on your way..
format Winodws XP
  1. Press Enter to setup Windows XP now. See screenshot above.
  2. If there is a copy of Windows XP on your computer and you wish to overwrite it you will have to press the escape button when prompted. (screenshot below) Do not install Windows XP in another directory unless you know what you are doing. Just overwrite the previous version as you should have backed up your data anyway.
Format Windows XP cd
  1. You should now make the partition that had windows on it blue and press D to delete the partition. It will ask if you are sure. Press L to confirm. More details on deleting partitions.
  2. Then Press C to create another partition and Windows will estimate a size for you. If you wanted to partition your hard drive into two equal parts you would have to do some math’s and then type the appropriate number in. Otherwise just going with what Windows puts there will be the minimum partition size.
  3. Press Enter to confirm size.
  4. Then it will ask you which partition you want to install Windows on. The default is C: drive. Select this by making it blue and press enter.
  5. If there are no partitions it will create one for you.
  6. Then it will ask you to format quick, normal, in fat32 or NTFS. Fat32 suits older computers so I choose a quick format with NTFS. Quick or Slow is fine. If you had errors it is better to use a slow format which can also be known as a low level format.
  7. From now on you just Follow the prompts and let it go..
  8. The computer will restart and it will try to boot from cd again…Do not press anything on the keyboard.. Just let it go through the stages of setup.
  9. Make sure you have your serial number ready to enter in. This can be found on your coa certificate which is a sticker usually put on the side of your computer.
  10. Do not remove the Windows XP CD until the computer has started up with a new desktop and icons.
Now the next process begins.. Installing your device drivers for your computer. See What are Device Drivers and why do I need them for my computer?
BIOS How to get there and change settings
NOTES
  • Follow the instructions carefully. Once you have done this a few times, you will see how easy it is.
  • The only way to learn is to try it yourself.
  • Be very careful not to make mistakes as restarting this process over and over can corrupt your computer. If you do make a mistake, try pressing the escape button as it can sometimes take you back to the previous screen.
  • If you cannot proceed through the format process, maybe you did not delete the old partition??
  • If there is more than one partition on your hard drive you can just format the one that has the previous version of Windows on it. That way the data on the other partition will be safe.
  • After errors ad viruses have been found on your computer, you should format a computer on on low level format , and not a quick format.

डाटा कार्ड की सेटिंग करे और किसी भी कम्पनी के सिम से नेट चलाए

डाटा कार्ड की सेटिंग करे और किसी भी कम्पनी के सिम से नेट चलाए


आजकल हर कोई इंटरनेट का इस्तेमाल करता है कोई अपने मोबाइल से नेट चलता है तो कोई 3G डोंगल से तो कोई ब्रॉडबेन्‍ड से इन्टरनेट चलाता है किसी भी डिवाइस से इंटरनेट का इस्तेमाल करने के लिए उसकी सेटिंग करनी पढ़ती है जैसे यूजर नेम पासवर्ड APN name इत्यादि मोबाइल से नेट चलाने के लिए तो सेटिंग ओटोमेटिग पीसी में डालने वाले सोफ्टवेयर में ही हो जाती है और ब्रॉडबेन्‍ड की सेटिंग भी नोर्मल ही होती है जो की कम्पनी द्वारा कनेक्सन लेने पर दे दी जाती है

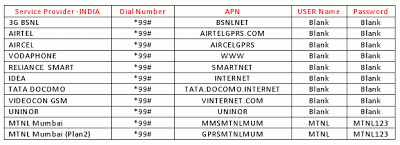
लेकिन आप अगर किसी डाटा कार्ड या 3G डोंगल से इंटरनेट का इस्तेमाल करना चाहते तो इसमें आपको सेटिंग को लेकर परेशानी आ सकती है Micromax जेसी कम्पनी अपनी इंटरनेट डिवाईस के साथ ऑटो सेटिंग देती है जिसमे आपको किसी भी कम्पनी का सिम लगाने के बाद मेनुवल सेटिंग करने की जरूरत नहीं पड़ती लेकिन जो दूसरी कम्पनी के डोंगल होते है या फिर अनलोक करे हुवे डोंगल होते है उनमे मेनुवल सेटिंग करने के बाद इन्टरनेट का इस्तेमाल किया जाता है हर कम्पनी के सिम की सेटिंग अलग अलग होती है बहुत से लोग तो इन सेटिंग के बारे में पता कर लेते है लेकिन बहुत से लोगो को कस्टमर केयर से बात करने के बाद भी इन सेटिंग की जानकारी नहीं मिल पाती आज मैं उन्ही लोगो के लिए वो सेटिंग लाया हु जिसे करने के बाद वो आराम से अपने इंटरनेट डाटा कार्ड से सेटिंग कर के इंटरनेट चला सकते है

डाटा कार्ड में मेनुवल सेटिंग करने के लिए आपको Go to Tools >> Option >>Profile Management में जाना होगा और आप जिस भी कम्पनी का सिम इस्तेमाल कर रहे है उसकी मेनुवल सेटिंग निचे दी गयी लिस्ट के अनुसार कर ले और बिना किसी की मदद के इंटरनेट का इस्तेमाल करे
undefined
ऊपर दिए गये चित्र को आप क्लीक करके बड़ा कर के सेटिंग देख सकते है ये सेटिंग मेने उस 4G डोंगल की साहयता से दी है जिस डोंगल का मैं भी इस्तेमाल करता हु मेरे द्वारा इस्तेमाल होने वाले 4G डोंगल को आप यहाँ क्लीक करके देख सकते है
ऊपर दी गयी सेटिंग तो उन लोगो के लिए है जो भारत में रहते है अब मैं उन लोगो के लिए ऐसा लिंक दे रहा हु जो भारत के होते हुवे भी देश से बाहर रहकर मेरी पोस्ट को रोज पढ़ते है मैं आपको जो लिंक देने वाला हु उसमे आपको वर्ड के सारी मोबाइल कम्पनियों की वो सब सेटिंग मिलेगी जिसे करने के बाद आप आराम से किसी भी कम्पनी का सिम लगा कर किसी भी टाइम इंटरनेट का इस्तेमाल कर सकते हो चाहे आप दुनिया के किसी भी कोने में हो आप यहाँ क्लीक करके उस साईट पर जा सकते है जहा आपको पुरे वर्ड के मोबाइल कम्पनियों के इन्टरनेट की सेटिंग मिलेगी और भी बहुत कुछ है इस साईट पर

उम्मीद करता हु आज की पोस्ट उन लोगो के जरुर काम आएगी जिन्हें डाटा कार्ड की सेटिंग पता करने के लिए बार बार कस्टमर केयर को फोन मिलाने के बाद भी पता न चली हो

टूथपेस्‍ट से कैसे रिपेयर करें सीडी

जब सीडी बाजार में आईं थी तो इनकी कीमत काफी ज्‍यादा होती थी लेकिन अब सीडी 7 रुपए की शुरुआती कीमत में बाजार में आसानी से मिल जाती है। जिसकी वजह से हम शायद सीडी की उतनी केयर नहीं करते लेकिन अगर आपके पास कोई ऐसी सीडी पड़ी है जिसमें कोई जरूरी डाक्‍यूमेंट हैं लेकिन स्‍क्रेच की वजह से वो चल नहीं पा रही तो हम आपको आज एक ऐसा तरीका बताएंगे जिसकी मदद से आप अपनी सीडी में लगे स्‍क्रेच कम कर उसे दुबारा प्रयोग कर सकते हैं।
  • सबसे पहले सीडी को साबुन के पानी से अच्‍छी तरह से साफ कर लें ताकि उसमे लगी धूल हट जाए
  • इसके बाद साफ कपड़े से सीडी का आराम से पोंछे
  • अब सीडी में टूथपेस्‍ट लगा कर उसे धीरे धीरे पूरी सीडी में लगाएं
  • इसके बाद 5 मिनट तक टूथपेस्‍ट को छोड़ दें
  • 5 मिनट बाद सीडी को नल के पानी से धे लें
  • सीडी में ध्‍यान से देख लें टूथपेस्‍ट लगा न हो
  • अब आपकी सीडी में लगे स्‍क्रेच मिट गए होंगे आप उसे दूबारा प्रयोग कर सकते हैं।

WATCH LIVE TV FOR FREE


Now you can watch free Tv on your pc by just using a VLC player.


Step 1 : First of all you need to have VLC player, if you don’t have vlc player kindly download and install it


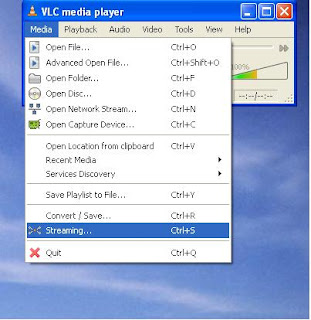
Step 2 : Now open Vlc Player, and select streaming option from the media menu present in the menu bar
undefined
Step 3 : Select network option and enter the url of the streaming channel. For example if you want to view B4u Music you need to add url
rtsp://217.146.95.166:554/playlist/ch12zqcif.3gp
in the url field and then select play option from the stream drop down menu.
Step 4 : After you click play in the above step, the channel will start streaming and you can watch your favorite channels.

Here is the List of many other channels which you will love to watch
Channel Name
Link
NDTV rtsp://ss1c6.idc.mundu.tv:554/prf0/cid_33.sdp
NDTV Profit rtsp://ss1c6.idc.mundu.tv:554/prf0/cid_31.sdp
Times Now rtsp://ss1c6.idc.mundu.tv:554/prf0/cid_2.sdp
Aaj Tak rtsp://ss1c6.idc.mundu.tv:554/prf0/cid_4.sdp
CNBC Aawaz rtsp://ss1c6.idc.mundu.tv:554/prf1/cid_34.sdp
CNBC TV 18 rtsp://ss1c6.idc.mundu.tv:554/prf0/cid_35.sdp
Headlines Today rtsp://ss1c6.idc.mundu.tv:554/prf0/cid_7.sdp
NDTV 24×7 rtsp://ss1c6.idc.mundu.tv:554/prf0/cid_29.sdp
NK News rtsp://94.75.250.53:554/rtplive/rknews.sdp
RAJ News rtsp://94.75.250.220:1935/live/rajnews2.sdp
ETV rtsp://94.75.250.53/rtplive/etv2low.sdp
Studio N rtsp://94.75.250.220:1935/live/studion2
SVBC rtsp://94.75.250.220/rtplive/svbclow
Zoo Vision rtsp://stream.zoovision.com/live.sdp
B4u Music rtsp://217.146.95.166:554/playlist/ch12zqcif.3gp
iMusic rtsp://217.146.95.166:554/playlist/ch26yqcif.3gp
Zee Tamil rtsp://121.244.145.226:554/prf1/cid_54.sdp
Zee Kannad rtsp://121.244.145.226:554/prf1/cid_55.sdp
Zee Bangla rtsp://121.244.145.226:554/prf1/cid_52.sdp
Music Box rtsp://stream.the.sk/live/musicbox/musicbox-3m.3gp
Bella Tv rtsp://217.146.95.166:554/playlist/ch29yqcif.3gp
Fashion Tv rtsp://217.146.95.166:554/playlist/ch27yqcif.3gp
Adventure rtsp://video3.multicasttech.com/AFTVAdventure3GPP296.sdp
Horror rtsp://video2.multicasttech.com/AFTVHorror3GPP296.sdp
Comedy rtsp://video3.multicasttech.com/AFTVComedy3GPP96.sdp
Classic rtsp://video3.multicasttech.com/AFTVClassics3GPP296.sdp
Crime rtsp://video2.multicasttech.com/AFTVCrime3GPP296.sdp
Mystery rtsp://video2.multicasttech.com/AFTVMystery3GPP296.sdp
Clubbing Tv rtsp://217.146.95.166:554/playlist/ch21yqcif.3gp

How To Use Pen Drives as RAM on Windows XP ,7

  • Insert the Pen Drive (1GB at least) in the USB port  try to prefer 4GB
  • Open My Computer.
  • Right-click on the icon of the newly inserted flash drive and select “Properties”.


  • In the “Removable Disk Properties” page go to “ReadyBoost” tab

  • If you want to dedicate the entire space of your flash drive for ReadyBoost you can select the radio button that says “Dedicate this device to ReadyBoost”.
  • Clilck “Ok” buttons on all Windows to accept and confirm your selections and configurations.
Do NOT pull flash drive out of USB Port while it is being used as a ReadyBoost device.
Do NOT save any data files on the flash drive when it is being used as ReadyBoost device.

Use Pen drive as a RAM in XP
  • Insert the Pen Drive (1GB at least) in the USB port try to prefer 4GB.
  • Right Click on My Computer -> Properties>Advanced -> Performance Settings

  • Click on Advanced -> Change


  • Select the Pen Drive Click on Custom Size” Check the value of space available ” Enter the same in the Initial and the Max columns.
OR U CAN USE Download eBoostr FOR MAKING PENDRIVE AS RAM
FOR FULL VERSION Download Torrent Eboostr or click me

छोटा और उपयोगी फोटो एडिटर

undefined
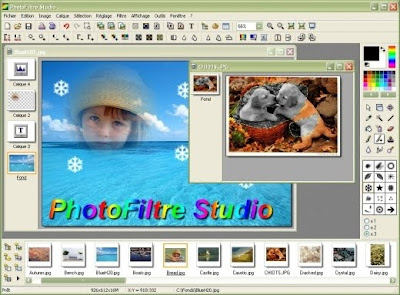
अगर आपको भारी भरकम फोटोशोप का विकल्प चाहिए तो ये औजार आपके काम आएगा ।
एक फोटो एडिटर जो फोटोशोप जितना अच्छा नही है पर अगर आपको बहुत ज्यादा फोटो एडिटिंग और उन पर इफेक्ट देने की जरुर ना हो तो आप ये 10 एमबी का फोटो एडिटर इस्तेमाल करें ।

इस औजार लगभग सभी मुख्य एडिटिंग टूल तो है ही इसमे साथ ही एक ख़ास टूल है जो फोटोशोप में नही है ।
फोटो की साइज़ बड़ी करने पर उनमे डस्ट या दाने आ जाते है जिससे फोटो ख़राब दिखने लगती है उसे दूर करने इसमे डस्ट रिडक्शन टूल है बस एक क्लिक और थोड़ा सा व्यवस्थित कर आप अपनी फोटो को स्मूथ कर सकते है खासकर मोबाइल से ली गई फोटो को ।

इस औजार का आकार है १० एमबी ।

Error Reporting in XP

If error reporting in XP is bugging you then turn it off.


When a system error occurs in XP, a little dialog box appears asking if you want to report the error to Microsoft. Click the message box to make it disappear. You don't have to report the error if you don't want to and on today's "Call for Help" Leo shows you how to turn off the feature if you find it distracting.

To disable error reporting, follow these directions:

1. Right-click My Computer and choose Properties.
2. Click the Advanced tab on your System Properties dialog box.
3. Click the Error Reporting button on the Advanced tab.
4. Place a checkmark next to "Disable error reporting."
5. Leave the other radio button unchecked next to the text labeled, "But notify me when critical errors occur."
6. Click OK.

मदर बोर्ड के ड्राइवर फ्री में डाउनलोड करने का सबसे आसान तरीका

मदर बोर्ड के ड्राइवर फ्री में डाउनलोड करने का सबसे आसान तरीका

मेने अपनी पिछली पोस्ट में मदर बोर्ड के ड्राइवर डाउनलोड करने वाले सोफ्टवेयर के बारे में बताया था जिसे आप यहाँ क्लीक करके देख सकते है। लेकिन बहुत से लोगो को ये सोफ्टवेयर समझ में नहीं आया तो सोचा इस बार आप लोगो को ऐसी जानकारी दू की आप बिना सोफ्टवेयर की साहयता के मदर बोर्ड के ड्राइवर डाउनलोड कर पाओ।

कभी कभी कंप्यूटर में खराबी आने के कारण हमे विंडोज को फॉर्मेट करना होता है फॉर्मेट करने के बाद विंडोज में सब सोफ्टवेयर दुबारा से डालने होते है। लेकिन जो सबसे मेन सोफ्टवेयर होता है वो है, आपके कंप्यूटर के ड्राइवर यानि साउंड ड्राइवर, विडियो ड्राइवर आदि वेसे तो अधिकतर सबके पास ही मदरबोर्ड के ड्राइवर की सीडी होती है। लेकिन अगर आपके पास ड्राइवर की सीडी नहीं है, तो निचे दिए गये तरीके को अपनाए और चुटकियो में अपने मदर बोर्ड के ड्राइवर डाउनलोड करे वो भी फ्री में।

जब आपके सिस्टम में ड्राइवर नहीं होता तो अधिकतर सिस्टम में उस ड्राइवर पर पीले रंग का आईकन बना होता है। अगर आप अपने मदर बोर्ड के ड्राइवर डाउनलोड करना चाहते हो तो सबसे पहले आप माई कंप्यूटर पर राईट क्लीक करके प्रोपर्टी पर जाए फिर Hardware+Device Manager पर क्लीक करे। अब आपको कोई सा भी ड्राइवर चाहिए उस पर राईट क्लीक करके प्रोपर्टी पर क्लीक करे।

इसके बाद जो विंडो खुलेगी उसमे ऊपर की साईट आपको चार ओपशंस दिखाई देंगे। वह आपको Details पर क्लीक करके Device instance id पर क्लीक करना है Device instance id पर क्लीक करने के बाद आपको निचे बॉक्स में एक आईडी दिखाई देगी जेसा आप निचे चित्र में देख रहे हो।
अब माउस से उस आई डी पर क्लीक करे और किबोर्ड से कंट्रोल C दबा कर उस आई डी को कॉपी करे फिर इस साईट पर आकर उस आई डी को सर्च बॉक्स में पेस्ट कर दे

आई डी सर्च करते ही आपके सामने डाउनलोड का लिंक आ जायेगा जिसे आप क्लीक करके फ्री में डाउनलोड कर सकते हो और उसे अपनी हार्ड डिस्क या सीडी में भी सेव रख सकते है ताकि आगे जरुरत पड़ने पर वो आपके काम आ सके

Crack BIOS Password !!!


Forgot BIOS Password ?
undefined
Do the following :

1.
Open the CPU
2. Now, observe the motherboard.
3. You notice a coin like silver Battery(3V).


---
--------------- NOTE -------------
This battery is 24 x 7 power supply for the BIOS, which is used to run the system clock will the main power is off. It also initiates the booting process when power is switched on.
--------------------------------------------------------------------------------------------------------

4. Remove the battery from the motherboard
.
(It is safe to remove the Battery)
5. Wait 30 seconds and place the battery back on the motherboard.
6. Now, when you start your system you won't be prompted for the BIOS password.

Enjoy !!!
------------------------------------ CAUTION -----------------------------------------------
1.
Perform on your own risk !2.
You have to set the time of your computer when you start again.

विंडो xp में डेस्कटॉप साइड बार लगाएं विंडो 7 की तरह.

अगर आप विंडो 7 आपरेटिंग सिस्टम अपने कंप्यूटर में इंस्टाल कर रखे होंगे या फिर विंडो 7 आपरेटिंग सिस्टम का प्रयोग कर रहे होंगे तो आपको मालूम हो की डेस्कटॉप साइड बार क्या होता है यदि नहीं जानते हैं तो आप इसे नीचे के चित्र में देखा सकते हैं. यह एक डेस्कटॉप यूटिलिटी है जिसे आप नीचे दिए लिंक से डाउन लोड कर सकते हैं. इसमे आप e-mail, weather, photo, time, अपना मीडिया प्लयेर, winamp player आदि सभी कुछ add panel  के जरिये एड कर सकते है.यदि आप इसे अपने कम्पूयटर में इंस्टाल करना चाहते है व इसकी सेट्टिंग के बारे में जानना चाहते है तो नीचे दिए निर्देश का पालन करें जिसका नाम है  डेस्कटॉप साइड बार.
undefined
सबसे पहले आप इसे दिए लिंक से अपने कंप्यूटर में डाउनलोड करे , डाउनलोड करने के बाद इसे कंप्यूटर में इंस्टाल करें.इनस्टाल करने के बाद स्टार्ट बटन पर क्लिक करके इस प्रोग्राम को ओपन करें नीचे दिए चित्र के अनुसार…

तो पहले चित्र के अनुसार आपके डेस्कटाप पर एक साइडबार बन जायेगा . आप इसमें अपने पसंद के अनुसार इसमें सेट्टिंग कर सकते हैं. आप इसके ऊपर माउस ले जाकर राईट क्लिक करेंगे तो एक पोप मेनू ओपन होगा फिर उसमे add आप्सन पर क्लिक करेंगे तो एक विंडो ओपन हो जायेगी . नीचे दिए चित्र के अनुसार……

अब इसमें से अपने पसंद का पैनल सेलेक्ट करें और एड करें. आप इसमें options पर क्लिक करके इसकी सेटिंग भी चंगे कर सकते हैं. इसे डाउनलोड करने के लिए यहाँ क्लिक करें.

एक से बढकर एक किबोर्ड शोर्टकट

Windows Shortcuts

Shift + F10 right-clicks.
Win + L (XP Only): Locks keyboard. Similar to Lock Workstation.
Win + F or F3: Open Find dialog. (All Files) F3 may not work in some applications which use F3 for their own find dialogs.
Win + Control + F: Open Find dialog. (Computers)
Win + U: Open Utility Manager.
Win + F1: Open Windows help.
Win + Pause: Open System Properties dialog.
Win + Tab: Cycle through taskbar buttons. Enter clicks, AppsKey or Shift + F10 right-clicks.
Win + Shift + Tab: Cycle through taskbar buttons in reverse.
Alt + Tab: Display Cool Switch. More commonly known as the AltTab dialog.
Alt + Shift + Tab: Display Cool Switch; go in reverse.
Alt + Escape: Send active window to the bottom of the z-order.
Alt + Shift + Escape: Activate the window at the bottom of the z-order.
Alt + F4: Close active window; or, if all windows are closed, open shutdown dialog.
Shift while a CD is loading: Bypass AutoPlay.
Shift while login: Bypass startup folder. Only those applications will be ignored which are in the startup folder, not those started from the registry (Microsoft\Windows\CurrentVersion\Run\)
Ctrl + Alt + Delete or Ctrl + Alt + NumpadDel (Both NumLock states): Invoke the Task Manager or NT Security dialog.
Ctrl + Shift + Escape (2000/XP ) or (Ctrl + Alt + NumpadDot) : Invoke the task manager. On earlier OSes, acts like Ctrl + Escape.
Print screen: Copy screenshot of current screen to clipboard.
Alt + Print screen: Copy screenshot of current active window to clipboard.
Ctrl + Alt + Down Arrow: Invert screen. Untested on OS's other than XP.
Ctrl + Alt + Up Arrow: Undo inversion.
Win + B : Move focus to systray icons.

General 


Ctrl + C or Ctrl + Insert: Copy.

Ctrl + X or Shift + Delete: Cut.

Ctrl + V or Shift + Insert: Paste/Move.

Ctrl + N: New... File, Tab, Entry, etc.

Ctrl + S: Save.

Ctrl + O: Open...

Ctrl + P: Print.

Ctrl + Z: Undo.

Ctrl + A: Select all.

Ctrl + F: Find...

Ctrl+W : to close the current window

Ctrl + F4: Close tab or child window.

F1: Open help.

F11: Toggle full screen mode.

Alt or F10: Activate menu bar.

Alt + Space: Display system menu. Same as clicking the icon on the titlebar.

Escape: Remove focus from current control/menu, or close dialog box.

General Navigation

Tab: Forward one item.
Shift + Tab: Backward one item.
Ctrl + Tab: Cycle through tabs/child windows.
Ctrl + Shift + Tab: Cycle backwards through tabs/child windows.
Enter: If a button's selected, click it, otherwise, click default button.
Space: Toggle items such as radio buttons or checkboxes.
Alt + (Letter): Activate item corresponding to (Letter). (Letter) is the underlined letter on the item's name.
Ctrl + Left: Move cursor to the beginning of previous word.
Ctrl + Right: Move cursor to the beginning of next word.
Ctrl + Up: Move cursor to beginning of previous paragraph. This and all subsequent Up/Down hotkeys in this section have only been known to work in Rich Edit controls.
Ctrl + Down: Move cursor to beginning of next paragraph.
Shift + Left: Highlight one character to the left.
Shift + Right: Highlight one character to the right.
Shift + Up: Highlight from current cursor position, to one line up.
Shift + Down: Highlight from current cursor position, to one line down.
Ctrl + Shift + Left: Highlight to beginning of previous word.
Ctrl + Shift + Right: Highlight to beginning of next word.
Ctrl + Shift + Up: Highlight to beginning of previous paragraph.
Ctrl + Shift + Down: Highlight to beginning of next paragraph.
Home: Move cursor to top of a scrollable control.
End: Move cursor to bottom of a scrollable control.
 

File Browser  

Arrow Keys: Navigate.
Shift + Arrow Keys: Select multiple items.
Ctrl + Arrow Keys: Change focus without changing selection. "Focus" is the object that will run on Enter. Space toggles selection of the focused item.
(Letter): Select first found item that begins with (Letter).
BackSpace: Go up one level to the parent directory.
Alt + Left: Go back one folder.
Alt + Right: Go forward one folder.
Enter: Activate (Double-click) selected item(s).
Alt + Enter: View properties for selected item.
F2: Rename selected item(s).
Ctrl + NumpadPlus: In a Details view, resizes all columns to fit the longest item in each one.
Delete: Delete selected item(s).
Shift + Delete: Delete selected item(s); bypass Recycle Bin.
Ctrl while dragging item(s): Copy.
Ctrl + Shift while dragging item(s): Create shortcut(s).
In tree pane, if any:
Left: Collapse the current selection if expanded, or select the parent folder.
Right: Expand the current selection if collapsed, or select the first subfolder.
Numpad Asterisk: Expand currently selected directory and all subdirectories. No undo.
Numpad Plus: Expand currently selected directory.
Numpad Minus: Collapse currently selected directory.


Accessibility  

Right Shift for eight seconds: Toggle FilterKeys on and off. FilterKeys must be enabled.
Left Alt + Left Shift + PrintScreen: Toggle High Contrast on and off. High Contrast must be enabled.
Left Alt + Left Shift + NumLock: Toggle MouseKeys on and off. MouseKeys must be enabled.
NumLock for five seconds: Toggle ToggleKeys on and off. ToggleKeys must be enabled.
Shift five times: Toggle StickyKeys on and off. StickyKeys must be enabled.
6.) Microsoft Natural Keyboard with IntelliType Software Installed
Win + L: Log off Windows.
Win + P: Open Print Manager.
Win + C: Open control panel.
Win + V: Open clipboard.
Win + K: Open keyboard properties.
Win + I: Open mouse properties.
Win + A: Open Accessibility properties.
Win + Space: Displays the list of Microsoft IntelliType shortcut keys.
Win + S: Toggle CapsLock on and off.
 

Remote Desktop Connection Navigation 

Ctrl + Alt + End: Open the NT Security dialog.
Alt + PageUp: Switch between programs.
Alt + PageDown: Switch between programs in reverse.
Alt + Insert: Cycle through the programs in most recently used order.
Alt + Home: Display start menu.
Ctrl + Alt + Break: Switch the client computer between a window and a full screen.
Alt + Delete: Display the Windows menu.
Ctrl + Alt + NumpadMinus: Place a snapshot of the entire client window area on the Terminal server clipboard and provide the same functionality as pressing Alt + PrintScreen on a local computer.
Ctrl + Alt + NumpadPlus: Place a snapshot of the active window in the client on the Terminal server clipboard and provide the same functionality as pressing PrintScreen on a local computer.
 

Mozilla Firefox Shortcuts 

Ctrl + Tab or Ctrl + PageDown: Cycle through tabs.
Ctrl + Shift + Tab or Ctrl + PageUp: Cycle through tabs in reverse.
Ctrl + (1-9): Switch to tab corresponding to number.
Ctrl + N: New window.
Ctrl + T: New tab.
Ctrl + L or Alt + D or F6: Switch focus to location bar.
Ctrl + Enter: Open location in new tab.
Shift + Enter: Open location in new window.
Ctrl + K or Ctrl + E: Switch focus to search bar.
Ctrl + O: Open a local file.
Ctrl + W: Close tab, or window if there's only one tab open.
Ctrl + Shift + W: Close window.
Ctrl + S: Save page as a local file.
Ctrl + P: Print page.
Ctrl + F or F3: Open find toolbar.
Ctrl + G or F3: Find next...
Ctrl + Shift + G or Shift + F3: Find previous...
Ctrl + B or Ctrl + I: Open Bookmarks sidebar.
Ctrl + H: Open History sidebar.
Escape: Stop loading page.
Ctrl + R or F5: Reload current page.
Ctrl + Shift + R or Ctrl + F5: Reload current page; bypass cache.
Ctrl + U: View page source.
Ctrl + D: Bookmark current page.
Ctrl + NumpadPlus or Ctrl + Equals (+/=): Increase text size.
Ctrl + NumpadMinus or Ctrl + Minus: Decrease text size.
Ctrl + Numpad0 or Ctrl + 0: Set text size to default.
Alt + Left or Backspace: Back.
Alt + Right or Shift + Backspace: Forward.
Alt + Home: Open home page.
Ctrl + M: Open new message in integrated mail client.
Ctrl + J: Open Downloads dialog.
F6: Switch to next frame. You must have selected something on the page already, e.g. by use of Tab.
Shift + F6: Switch to previous frame.
Apostrophe ('): Find link as you type.
Slash (/): Find text as you type.
 

Gmail Shortcuts 


 Note: Must have "keyboard shortcuts" on in settings.
C: Compose new message.
Shift + C: Open new window to compose new message.
Slash (/): Switch focus to search box.
K: Switch focus to the next most recent email. Enter or "O" opens focused email.
J: Switch focus to the next oldest email.
N: Switch focus to the next message in the "conversation." Enter or "O" expands/collapses messages.
P: Switch focus to the previous message.
U: Takes you back to the inbox and checks for new mail.
Y: Various actions depending on current view:
Has no effect in "Sent" and "All Mail" views.
Inbox: Archive email or message.
Starred: Unstar email or message.
Spam: Unmark as spam and move back to "Inbox."
Trash: Move back to "Inbox."
Any label: Remove the label.
X: "Check" an email. Various actions can be performed against all checked emails.
S: "Star" an email. Identical to the more familiar term, "flagging."
R: Reply to the email.
A: Reply to all recipients of the email.
F: Forward an email.
Shift + R: Reply to the email in a new window.
Shift + A: Reply to all recipients of the email in a new window.
Shift + F: Forward an email in a new window.
Shift + 1 (!): Mark an email as spam and remove it from the inbox.
G then I: Switch to "Inbox" view.
G then S: Switch to "Starred" view.
G then A: Switch to "All Mail" view.
G then C: Switch to "Contacts" view.
G then S: Switch to "Drafts" view.

List of F1-F9 Key Commands for the Command Prompt 

F1 / right arrow: Repeats the letters of the last command line, one by one.
F2: Displays a dialog asking user to "enter the char to copy up to" of the last command line
F3: Repeats the last command line
F4: Displays a dialog asking user to "enter the char to delete up to" of the last command line
F5: Goes back one command line
F6: Enters the traditional CTRL+Z (^z)
F7: Displays a menu with the command line history
F8: Cycles back through previous command lines (beginning with most recent)
F9: Displays a dialog asking user to enter a command number, where 0 is for first command line entered.
Alt+Enter: toggle full Screen mode.
up/down: scroll thru/repeat previous entries
Esc: delete line
Note: The buffer allows a maximum of 50 command lines. After this number is reached, the first line will be replaced in sequence.